A complete guide to ultrasonic hatch cover tests on bulk carriers. Learn the principles, IMO/RightShip requirements, equipment, calibration, detailed procedure, safety, common issues, reporting format, and pro tips to prevent cargo claims.
Introduction
On bulk carriers, hatch covers are the critical barrier between cargo and seawater. Even the smallest leak can cause devastating consequences — wet damage to grain, rusting of steel coils, heating of coal, or liquefaction of mineral concentrates. The result? Heavy cargo claims, disputes with charterers, detention by PSC, and severe financial loss for owners.
For decades, seafarers relied on hose tests and chalk tests to verify hatch cover tightness. While these methods are still recognized under SOLAS and class rules, they come with serious drawbacks — weather dependence, time wastage, water usage, and low accuracy.
Enter the Ultrasonic Hatch Cover Test (UST): a scientific, accurate, and industry-approved method that has now become the global standard for checking hatch cover weathertightness.
This guide is written for ship officers, It explains not just the procedure, but the principles, best practices, and inspection expectations.
What is an Ultrasonic Hatch Cover Test?
The ultrasonic hatch cover test verifies weathertightness — the ability of a hatch cover to prevent water ingress during normal sea conditions (spray, rain, green seas).
A transmitter placed inside the cargo hold emits ultrasonic sound waves (around 40 kHz).
A receiver unit (hand-held detector) is used along the hatch cover joints, compression bars, and gaskets.
Any leakage in sealing arrangements allows ultrasonic waves to escape, which are detected and displayed as numerical values (in decibels or percentage).
Note: Hatch covers are designed to be weathertight, not watertight. They must prevent water entry under spray and wave impact but are not expected to hold water under full submersion.
Regulatory & Industry References
SOLAS Ch. II-1 Reg. 15 – Requires weathertight hatch covers on bulk carriers.
IMO Resolution MSC.215(82) – Guidelines for condition assessment of hatch covers.
IACS UR Z17 – Recognizes ultrasonic testing as an accepted method for verifying tightness.
RightShip Inspections – Specifically mention ultrasonic tests as evidence of hatch cover integrity.
P&I Clubs – Strongly recommend ultrasonic testing before loading sensitive cargo.
Why Ultrasonic Testing is the Gold Standard
Method Pros Cons
Hose Test Familiar, cheap, visual confirmation Weather dependent, damages cargo if loaded, large manpower required
Chalk Test Quick, no water required Inaccurate, purely visual, cannot detect micro-leaks
Ultrasonic Test Accurate, dry, works with cargo inside, RightShip-accepted Requires equipment, training, calibration
Key Advantage: The test can be carried out at any time, even with cargo inside the holds. This saves operational delays and prevents disputes.
Equipment Required
A professional ultrasonic test kit usually includes:
- Ultrasonic Transmitter – Emits omnidirectional 40 kHz sound waves.
- Receiver/Detector – Hand-held sensor with digital display (dB or % scale).
- Calibration Reference Plate – Used before and after testing to ensure accuracy.
- Tripod / Mount – For stable placement of transmitter inside the hold.
- Communication System – Radios for coordination between hold and deck teams.
- Documentation Kit – Log sheets, camera, marking chalk/tape, and printer (some advanced kits provide instant reports).
Step-by-Step Procedure for Ultrasonic Hatch Cover Test
- Pre-Test Planning
Review vessel schedule and plan testing before cargo operations if possible.
Conduct toolbox meeting: explain risks, confined space entry, and roles.
Prepare permits for confined space entry into cargo hold.
Ensure gas-free atmosphere (O₂ > 20.9%, no toxic gases).
Ventilate the hold and ensure safe access ladders, lighting, and PPE.
- Placing the Transmitter
Position the transmitter in the centre of the hold at mid-height (tripod).
Ensure no obstructions block sound path.
Switch to maximum output (100%) for large hatch covers.
Close hatch covers properly: hydraulic locks, cleats, wedges, and chain stoppers must be engaged.
- Calibration of Equipment
Calibrate receiver using reference plate at a fixed distance.
Confirm background noise level is below acceptable limit (usually <10 dB).
Record calibration in the test log.
- Scanning the Hatch Covers
With the receiver, scan slowly (10–15 cm per second) along:
Hatch coamings
Cross joints
Corner joints
Compression bars
Rubber packing
Observe readings:
0–10% leakage → Acceptable
10–30% leakage → Monitor and repair at earliest
>30% leakage → Immediate corrective action required
- Recording Observations
Mark leakage areas with chalk or tape.
Take photos of detector screen alongside leakage points.
Log readings in structured format (location, % leakage, remarks).
- Repairs & Re-Test
Typical defects: worn gaskets, poor compression, damaged landing pads, misaligned panels.
Carry out on-the-spot repairs (tightening cleats, lubrication, cleaning).
For major issues (gasket renewal, steel replacement), plan during next drydock.
Re-test affected areas until leakage falls within acceptable range.
Safety Considerations
Confined Space Entry: Always gas test and issue entry permits.
Battery & Electrical Safety: Ensure transmitter batteries are fully charged; avoid sparking inside holds.
Weather Safety: Do not conduct deck-side testing in rough weather without harnesses.
Team Safety: Maintain constant radio contact; never leave a crew member alone inside a cargo hold.
Common Mistakes to Avoid
Skipping calibration → unreliable results.
Dirty coamings or gasket areas → false leak readings.
Scanning too fast → misses micro-leaks.
Testing with hatch not properly secured → incorrect results.
Failing to keep test reports → inspectors will not accept undocumented claims.
Reporting & Documentation
A professional ultrasonic test report should include:
Vessel name, IMO number, date, and port.
Equipment details (make, model, calibration certificate number).
Test method, sound strength setting, calibration proof.
Table of results (location vs leakage %).
Photographic evidence of leakage points.
Statement of overall hatch cover condition.
Signature of responsible officer or attending surveyor.
Tip: Keep ultrasonic test reports in the Hatch Cover File. RightShip, PSC, and charterers often request them.
Surveyor & RightShip Expectations
Surveyors typically check:
Date of last ultrasonic test.
Calibration certificate validity.
Evidence of repairs carried out after last leakage findings.
Crew awareness and ability to demonstrate equipment use.
Having a well-documented report + crew competence impresses inspectors and reduces chances of deficiencies.
Pro Tips from Experience at Sea
Conduct ultrasonic testing before loading moisture-sensitive cargo like grain, sugar, steel coils.
Carry out “training runs” with cadets and junior officers — builds competence and confidence.
Maintain a hatch cover maintenance log (greasing, gasket renewal, cleat adjustment). Combine UST results with routine checks.
Always re-test after heavy weather passages or after drydock repairs.
Invest in crew training for ultrasonic kits — don’t depend only on external surveyors.
Conclusion
The Ultrasonic Hatch Cover Test is more than just a compliance requirement — it is a powerful risk management tool that prevents cargo claims, ensures vessel reputation, and satisfies RightShip and PSC inspections.
For ship officers, mastering this test means:
Protecting cargo integrity.
Avoiding financial loss for owners.
Demonstrating professionalism to charterers and surveyors.
A hatch cover may appear “tight” to the naked eye, but only ultrasonic testing proves it. As the saying goes: what the ear cannot hear, the ultrasonic test will reveal.
A weathertight hatch cover = a safe voyage = a satisfied charterer.
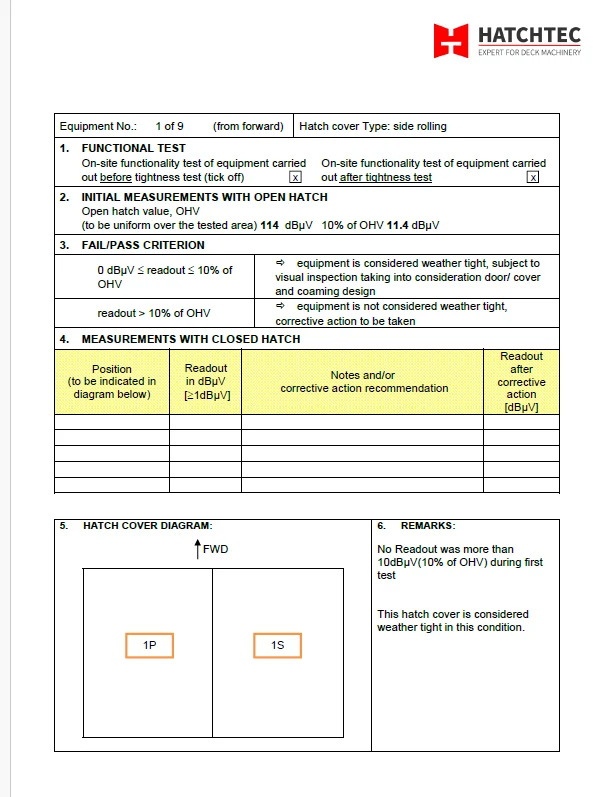
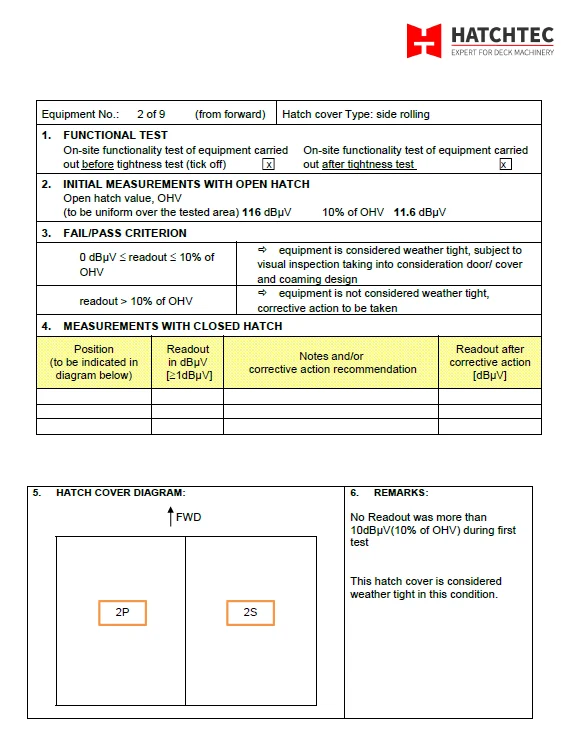
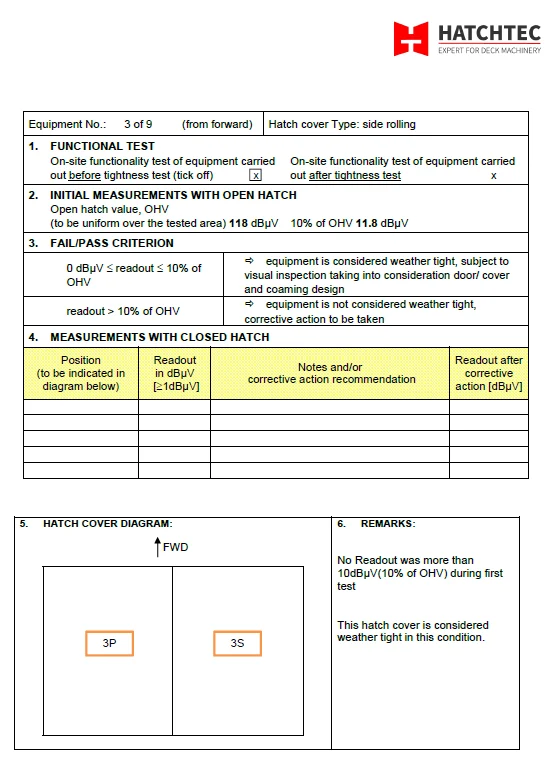
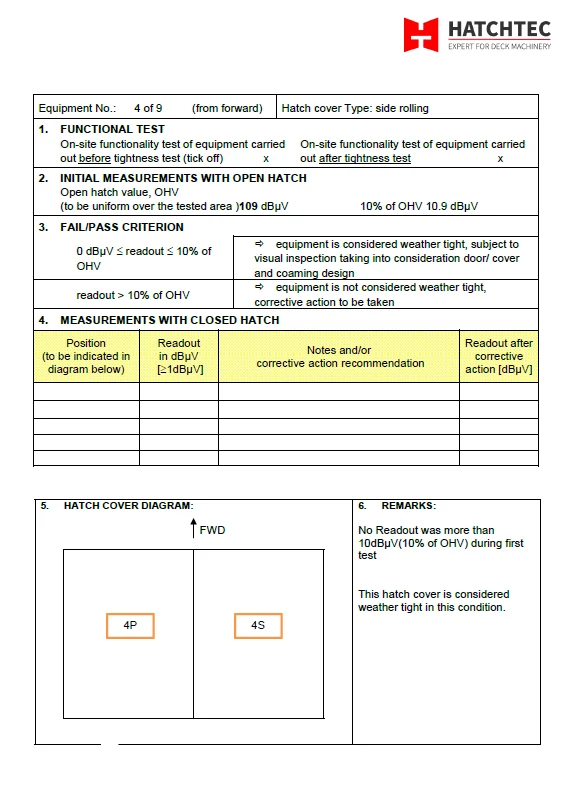
Below is an extract from the ULTRASONIC TESTS of hatch covers No.1 to No.4 on a bulk carrier done at dry dock.